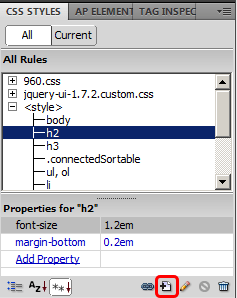
CSS allows you to control the look and feel of a webpage. Dreamweaver has a CSS designer built into it, to make it easier to add CSS to your website.
Creating a CSS Selector from an Element that Exists
 First you will generally want to click on the tag that you want to apply a new CSS rule to, but this is not required. Next, click on the new CSS button found in the CSS panel.
Once you have your tag selected, you can then apply the rules that you want to, to your selector. The rule panel is broken down into categories. That means you may need to click on one of the categories to the right side of the window so you can find the property that you want to edit.
Creating a New Selector
Alternately, you can click on the new CSS rule button, and just create a new selector. To do so, you will need to determine if you are creating a selector for a tag, class, id, or a compound selector. An id has a hash mark/pound symbol before it (#), and a class is started with a period (.).
Simple CSS selectors are below:
p { } /* paragraph */
.class1 {...} /* CSS Class - notice the . prefix */
#id {...} /* CSS ID - notice the # prefix */
Compound selectors more complex and Dreamweaver uses this as a catch all. Generally are based off of multiple selectors, so a parent and child tag a used. For example, select paragraphs inside an element with an id of content. However, compound can also be used for pseudo-class selectors, like :hover. Examples of Dreamweaver’s compound selectors are below:
#content p { ... }
a:hover
Once you’ve created your selector, you can apply it to a tag by using the property panel. Simply click on the element you want to change, and verify you have the right tag in the tag selector. Then use the property panel’s drop down options to select a class or id to use.

This video shows you how you can add CSS, using Dreamweaver, to a web page.
How to Add CSS to a Web Page in Dreamweaver was originally found on Access 2 Learn